
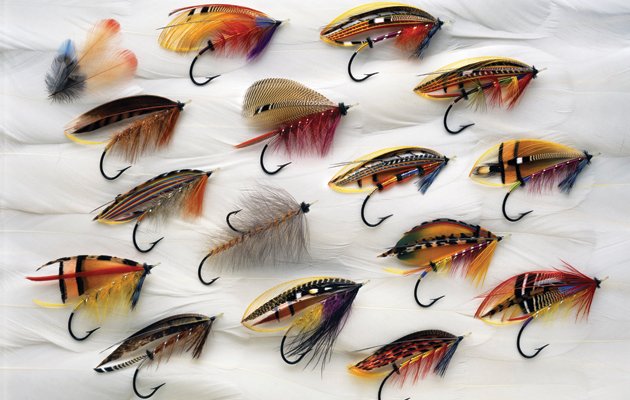
Tying salmon flies is a rewarding and creative aspect of fly fishing. Crafting your flies allows you to tailor them to specific conditions and preferences, enhancing your fishing experience. Whether you’re a beginner or an experienced fly tier, learning how to tie salmon flies can add a new dimension to your angling adventures. In this guide, we’ll walk you through the process, from selecting materials to mastering the tying techniques.
How to Tie Salmon Flies
Understanding the Basics
Before you dive into tying salmon flies, it’s important to understand the basics. Salmon flies are designed to imitate the prey of salmon, including insects, small fish, and other aquatic creatures. They come in various patterns and styles, each suited to different fishing conditions and salmon species. Familiarizing yourself with the different types of salmon flies and their uses will help you choose the right patterns to tie.
Gathering Your Materials
To tie salmon flies, you’ll need a variety of materials. Here’s a basic list to get you started:
- Hooks: Use salmon fly hooks, which are larger and stronger than those used for smaller fish.
- Thread: A strong, thin thread is essential for securing materials to the hook.
- Feathers: Choose from a variety of feathers, such as hackle, marabou, and peacock herl, to create different textures and appearances.
- Fur and Hair: Materials like rabbit fur, deer hair, and synthetic fibres add bulk and movement to your flies.
- Tinsel and Flash: These materials add sparkle and attract the attention of salmon.
- Adhesives: Head cement or super glue helps secure knots and materials.
Setting Up Your Workspace
Having a well-organized workspace is key to successfully tying salmon flies. Set up a clean, well-lit area with all your materials within reach. A fly-tying vise is essential for holding the hook steady while you work. Additionally, have a variety of fly-tying tools on hand, including scissors, bobbins, hackle pliers, and bodkins.
Step-by-Step Tying Process
Now that you’re set up, let’s go through the step-by-step process of tying a basic salmon fly.
1. Attach the Hook
Secure the hook in your fly-tying vice with the shank parallel to the table. Ensure it’s firmly in place, as a stable hook is crucial for tying.
2. Start the ThreadBegin by attaching the thread to the hook shank, starting near the eye and wrapping it back toward the bend. This creates a base layer for attaching materials.
3. Add the Tail
Select a feather or fur for the tail. Measure it against the hook shank to ensure it’s the right length, typically about the length of the shank. Secure the tail material to the hook with tight thread wraps.
4. Create the Body
For the body, use materials like chenille, tinsel, or dubbing. Attach one end of the material at the tail and wrap it forward along the shank, securing it with thread wraps as you go. Ensure the body is evenly covered and well-secured.
5. Add the Wing
The wing is a prominent feature of many salmon flies. Choose feathers or synthetic fibres for the wing, measuring them against the hook shank for the desired length. Secure the wing material to the top of the shank, using tight thread wraps to hold it in place.
6. Wrap the Hackle
Hackle feathers add movement and mimic the legs or fins of prey. Select a hackle feather, strip the base of excess fibres, and tie it in at the front of the body. Wrap the hackle feather around the shank, moving forward, and secure it with thread wraps near the eye of the hook.
7. Finish the Head
To complete the fly, form a neat head by wrapping the thread several times near the hook eye. Trim any excess materials and whip finish the thread to secure it. Apply a small amount of head cement to the thread wraps to ensure durability.
Experimenting with Patterns
Once you’ve mastered the basic steps, experiment with different patterns and materials to create a variety of salmon flies. Each pattern can be adjusted to suit specific fishing conditions and personal preferences. For example, using brightly coloured materials can make your flies more visible in murky water, while subtle, natural colours can be more effective in clear conditions.
Practice Makes Perfect
Tying salmon flies requires practice and patience. Don’t be discouraged if your first few attempts aren’t perfect. With time and experience, your skills will improve, and you’ll be able to create intricate, effective flies. Join a local fly-tying group or take online courses to learn from experienced tiers and gain new techniques.
Conclusion
In conclusion, tying salmon flies is a fulfilling and essential skill for any angler interested in fly fishing for salmon. By understanding the basics, gathering the right materials, and following the step-by-step process, you can create effective and beautiful flies. Experiment with different patterns, practice regularly, and soon you’ll be tying salmon flies that will enhance your fishing adventures. So, set up your vice, gather your materials, and start tying your salmon flies today! Happy fishing!


